Android Developers Officials

Android Developers Official Facebook Page

Wednesday 23 April 2014

How to Disable the “My Magazine” feature in Samsung Galaxy S5

How to Disable the “My Magazine” feature in Samsung Galaxy S5


The My Magazine feature is a good addition to the new TouchWiz UI in the Galaxy S5, and this is similar to the Blinkfeed feature in the HTC Sense. This keeps its place on the extreme left when you scroll through the home screens, and it gives you the latest updates from the selected social media websites, and the stories are quite interesting as only the trending and interesting ones are shown there. For the HTC users, they had to wait for an update if they wanted to disable this feature, but Samsung isn’t bad on this part as there is a way you can disable the My Magazine feature if you didn’t want to use it.

Disable My Magazine S5

For those who are going through the My Magazine app settings, there is nothing available there for you to do to disable the application or the newsfeed, as you need to go to the Application Manager for disabling the app and not just the news feed.

Scroll to Settings > Applications > Tap on Application Manager
In the Application Manager, go to the “All” tab and there, locate the “My Magazine” app to open the settings for this particular application.

Samsung Galaxy S5 My Magazine App Manager

In the App info page of My Magazine, you would see the options “Force stop” and “Disable”. While force stopping the app would make the app non-functional for just a few seconds, you need to tap the “Disable” option to completely stop the app from working until you wanted it to function again.

You would get a warning saying “Disable built-in apps? Disabling built-in apps may cause errors in other apps”. You need to accept it and hit “OK” to disable the My Magazine application.

Samsung Galaxy S5 Disable My Magazine

Once you tap the Disable option, this application would go into the “Disabled” apps list from where you could enable it anytime later. The My Magazine isn’t really an annoying app as it lies in the corner and opens only when you wanted to check the latest news feed, but you can easily disable it if you felt it shouldn’t have been there as one of the home screens at all.

How to receive WhatsApp Notification on Lock Screen in Android Phone?

How to receive WhatsApp Notification on Lock Screen in Android Phone?


Whatsapp is the leading Messaging App which has almost wiped or conventional SMS services provided by network providers. Around 450 million users are into Whatsapp and if you are one of them and are wondering how to activate Notifications to appear on Lock Screen here is the tutorial for you.
Launch WhatsApp and click on the 3 dots icon on the right side top of the screen, or press the Menu button on your smartphone so as to open the menu where you need to click on “Settings”.


WhatsApp Chat Settings

From the list of options that appear select Notifications.
Under Notifications you will find many options but you have to scroll down and select “Pop Up Notifications”.

WhatsApp Popup Notifications

A Small window will appear with the following options: No popup, Only when screen On, Only when Screen Off, Always show Pop up. If you want to see a pop up on your lock screen even when the display is off click on Only when Screen Off this will help you to get messages from contacts as notifications on your lock screen.

WhatsApp Lock Screen Notification

If you want to get a notification every time you receive a message you have to click on Always Show Popup which will bring the message window anywhere on your screen even when you are browsing or playing a game which can get irritating sometimes, mainly because of the number of groups which we are added to.
If you want to get notifications when you turn on your Screen to check for notifications or time then you can click on “Only when Screen On” i feel this is the best option to save your battery and not disturb you, until and unless you have some conversation which cannot be missed.

And if you are fed up of the regular notifications which are disturbing you, this can be turned Off easily by following the same steps and selecting the “No Popup” option in the list.

And as you can see in the image, your messages will appear on your home screen as a Notification in a popup box, but it can get awkward when someone is using your phone and these messages pop up which can let anyone read them out and you have to hastily take the phone back.

Google Project Ara modular smartphone coming in January 2015

Google Project Ara modular smartphone coming in January 2015


The Google Project Ara modular Smart phone is a device that give you the option of you dream Smart phone. Many of you might have not gone across this name, so let me say you that Project Ara is part of ATAP (Advance technology and Projects) group. This device is going to come next year, probably in the month of January.

First off let me explain you about this device, the Modular smart phone will let its users swap and change its components so that they can upgrade their smart phone or change them according to their needs. Initially you will be having a base piece of hardware that will be known as Endo and later features can be added to this Endo as plug and play models. The models can be anything, RAM, Camera, Processor etc.


Project ara Grey phone


The main aim of this project to make a Smart phone that exactly suits your needs and lets you create it accordingly. The entry level Grey Phone might me costing around $50 to produce but the head of the Project Ara, Paul Eremenko noted that the price of this device will be determined by commerce partners and also said that the device will be having five 2 x 1 unit modules and two 2 x 2 unit modules that will be attached to the Endo using electro- permanent magnets.

The Android drivers that would support this device will be available in the month of December and Google has plans to hold two more Project Ara conferences in July and September this year. A pre-production prototype of this will be shown in the month of September. I am very excited to know more about this device as new things pop up every time in the conferences held. This is definitely a feature device and claiming to give a life of 5-6 year which more than any high end Smart phones that you are using now. Let’s wait and see how this grey phone turns up and do comment below and share your thoughts.

Earlier - Project Ara Modular Smartphone Developer Conference on April 15, 16 – Details – February 28, 2014

Google’s ATAP (Advanced Technologies and Projects) group is on a roll after introducing its 3D map making Project Tango Smartphone last week, now the Google ATAP revealed details on the first Ara Developers’ Conference that will be on April 15-16. Earlier we have seen Joshua talked about Project Ara (from Motorola at the time) back in October as a campaign that focused on attracting OEM interest into a modular Smart phone design.  The results of that campaign take the next step with Google announcing the first set of developer conferences for a modular device.

Project ARA

The platform is meant to be a single hub onto which the user can place their own hardware that they desire without having to go for a new or other device.  This means CPUs, cameras, sensors, screens, baseband, modems, connectivity, storage etc can be increased or decreased according to the uses wish. Project Ara takes this complexity one stage further, and there has to be a fundamental software base to solve this so, ATAP is going to be doing three developers’ conferences in 2014, starting on April 15-16 at the Computer History Museum in Mountain View, California.

Google says, and this event will focus specifically on the alpha release of the Ara Module Developers’ Kit (MDK) which will come to the web in early April. The free platform will offer developers “everything [they] need” to get up and running building Ara hardware modules, ATAP promises. Limited in-person attendance is available, with a $100 fee ($25 for students) covering food and a special social session. Google is approving these based on the strength of your application. However there will be a live webcast and interactive Question & Answer sessions of the conference also.

We don’t know what the other two conferences will be about It’s been a while since we have heard about Project Ara so it should be a good news to every on the progress. We would like to see this project getting successful and come out with the require results. Stay tuned for more information and we will be updating all the further information.

How to Capture Screenshot on Samsung Galaxy S5 (2 Methods)

How to Capture Screenshot on Samsung Galaxy S5 (2 Methods)


We had done the explanation with the earlier flagship devices for the most simple techniques, and the same cannot be missed out for the Samsung Galaxy S5, which has more than the simple ways to get things done. For example, if you wanted to capture a screenshot on the Galaxy S5, there is more than one way for it, and it depends on how you wanted to do it.

For those who have earlier used any Samsung Galaxy phone, it won’t be any different for them as its the same physical keys to be used if you wanted to capture a screenshot on the S5 too, but if you are bored or have a situation where the pressing of buttons cannot be done, there is another way to capture the screenshot.

Samsung Galaxy S5 Screenshot Physical Keys

Samsung Galaxy S5 Screenshot with Physical keys: The keys you need to press here, are the power key along with the home key, both at the same time to take the screenshot. This would become easier when you have both the hands free because the buttons aren’t that close for a single hand to press them together.
  • You just need to be ready on the particular page you wanted to capture
  • Press the home and power buttons together
  • You will hear the camera click sound and in a couple of seconds, there would be a message on the screen saying “Copied to clipboard”
  • In the notification panel, there would be a message saying “Screenshot captured” with the preview of the screenshot, and direct options for the users to edit, delete or share the screenshot
This way of capturing the screenshot is the default one which is seen in most of the Android ICS and later devices, and the physical key combination changes based on the brand.

Samsung Galaxy S5 Screenshot with Swipe Gesture: For those who wanted something different from the physical key combination for the screenshot, here’s a way. This is one of the gestures which the phone has in its list, and a swipe of your palm on the screen would capture the screen for you.

Samsung Galaxy S5 Screenshot Swipe Gesture

To set this up, you need to go Settings > Motion > Motions and Gestures > Palm swipe to capture

Galaxy S5 Screenshot Gesture

Going into that section, you can toggle it on / off. You just have to swipe from one corner of the screen to the other, irrespective of the side. You need to make sure that the entire side (with the little finger facing the screen) is touching the screen before you swipe it.

The captured screenshot take a place in the File System under the Pictures folder, and in the Gallery, there is a separate folder created for the Screenshots.

These are pretty easy ways for capturing the screenshot on the Samsung Galaxy S5, and the physical method might be very well known to most of the users, but it does come handy to those who are shifting from some other smartphone to the Galaxy S5.

UC Browser for Android gets IPL 2014 Content and Services (Commentary, Stats, Photos)

UC Browser for Android gets IPL 2014 Content and Services (Commentary, Stats, Photos)


Just as the IPL 7 (Indian Premier League) starts, UCWeb has come up and added new cricket content and service for its app on Android and also on Windows Phone. The update brings new UI (User Interface) to the app that will provide the most comprehensive IPL content and services that will be including previews, commentaries, stats, photos, interviews, videos and more.  This will be also bringing a new Cricket add-on that will be reminding you about all the upcoming matches.

The updates also include an IPL guessing game that will be letting the user to guess the winner of each match and will be giving you points for every correct answer and give you the chance of winning a IPL ticket to watch the match live and not only that you have the chance to win custom cricket gear and other gadgets that include the Apple iPhone 5s.


The new UC Browser provides users with more interactive and intuitive cricket services. With a lot of IPL action happening on weekdays where cricketing enthusiasts might not have the resources or the time to catch live matches, UC Browser is a boon. It has a smart IPL zone that enables users to catch live scores, instant updates and even get timely reminders for the favourite team matches while on the move. We are empowering the users completely so that they never miss any IPL update in future. This is a very unique initiative from UC Browser which is definitely going to attract a lot of cricket fans in India -said Abhishek Sharma, the Director of marketing Communications at the UCWeb India.

UC Browser has recently crossed 500 million users and this cricket content is available on Windows Phone also. So are you a cricket fan? Don’t want to miss anything from the cricket world. Download the UC Browser app for free by clicking the link here.

Gionee Elife E7 Mini Launched in India for Rs. 18999 – Specs, Photos & Details

Gionee Elife E7 Mini Launched in India for Rs. 18999 – Specs, Photos & Details


Gionee Smart phones have launched its Elife E7 mini that is the compact version of the Elife E7. The mini version of the flagship Elife E7 was announced in India last week and went for sale online. This Smart phone was announced last year back in December. This device will be coming with a 4.7 inch HD IGZO screen and will be powered by a 1.7 GHz Octa core MediaTek MT6592 processor with high performance and high efficiency at low power consumption.


This 4.7 inch device is powered by an Octa core processor clocking at 1.7 GHz and coupled with a 1 GB of RAM and will be running on Android 4.2 Jelly Bean Operating System. This is a dual SIM variant and will be powered by a 2100 mAh battery. The on-board memory of the device is at 16 GB, and also comes with OTG Support, Professional music system The important feature of the device is its camera which is a 13 MP sensor with the ability to take a 360 degree rotation and can be used as the front camera too! 

This camera lens come with Blue Glass Filter that effectively filters infrared and gives more natural and clearer images. This Elife E7 mini comes built in with 12 level of Auto Beauty feature that the makes the photos taken from it flawless and it also has features like Eraser mode, Panorama shot, Gesture mode and HDR Mode which will give best picture capturing making photography more fun with it.


Specifications of Elife E7 mini

4.7 inch HD IGZO capacitive touch screen
1280 x 720 pixels resolutions
1.7 GHz Octa-Core MediaTek MT6592 processor
Mali 450-MP4 GPU
1 GB RAM
Android 4.2 Jelly Bean OS with Amigo 2.0 UI
13-megapixel swivel camera
16 GB internal, no expandable storage option available
Connectivity: 3G HSDPA, Wi-Fi 802.11 b/g/n, Bluetooth 4.0, GPS
Battery: 2100 mAh

The response to Elife E7 has been incredible, and we’re excited for customers to experience the new ELife E7 mini as we think customers will love these thin, light, powerful new smartphone’s.” 

said Mr. Arvind.R.Vohra, Gionee Smartphones – India head This 8.6 mm thin device will be coming in Purple, Blue, Graphite Black and White color variants and will be available in India for Rs. 18,999 (MOP).

Samsung Galaxy S5 breaks Launch Day Sales Record of Galaxy S4 by 30%

Samsung Galaxy S5 breaks Launch Day Sales Record of Galaxy S4 by 30%


The South Korean electronics giant has claimed that its new flagship device the Samsung Galaxy S5 that was launched few days back has been selling better than its previous flagship model Galaxy S4. The Galaxy S5 now has the highest opening day sales for Samsung setting a new record and it is 30% more than its predecessor. This report came from ZDnet Korea and in some parts of the European market the device sales got twice compared with its earlier model.


The Samsung Galaxy S5 went on sale starting from April 11th in 125 different countries globally and will be launched in another 25 new markets in the coming few days making the availability of this device in 150 different countries. The Company has sold 10 million units during the first month sales of its Galaxy S4 and the Galaxy S3 sold the same 10 million units in the first 50 days of its sale. However Samsung did not revealed the number of Samsung Galaxy S5 units sold in the first day of the sale.


http://android-developers-officials.blogspot.com/2014/04/samsung-galaxy-s5-breaks-launch-day.html


Samsung was criticized for retaining the same design from its predecessors but it still going on sale pretty well. Samsung has also claimed that there is high demand for the device in countries like Saudi Arabia, India and France and also said that there was a big line for the Galaxy S5 in those markets. The markets experts and analysts are expecting the sales of Galaxy S5 sales to cross 10 million within the first month of its launch since the all Galaxy S device has better sale than its predecessors till date.

Let me remind you that the latest flagship device will come with many new features like Heart rate sensor, Finger print scanner and much more. Along with the device the Samsung Galaxy Gear Fit and Gear 2 smart watch was also released. Are you planning to get this device? Already got one? Drop your comments below.

Manual Update Galaxy Note 3 N900 with Official XXUDNC4 Kitkat 4.4.2 Firmware – Guide

Manual Update Galaxy Note 3 N900 with Official XXUDNC4 Kitkat 4.4.2 Firmware – Guide


Samsung Galaxy Note 3 N900 users can now make the most of their device as finally Samsung has started releasing the much needed KitKat 4.4.2 Android OS without further delays.  This new Kitkat 4.4.2 Android OS comes with tons of new features along with the much needed stability and other fixes which are otherwise were not there in Jellybean updates. So after checking out the detailed guide on how to update this firmware, you need to follow the list of quick pre requisites which are mentioned below. This update is dubbed as XXUDNC4. This firmware has been released in Russia only and will be gradually pushed to other regions as well.


Note: Applying this update won’t root the device in any manner as this is the official firmware released by Samsung.

Quick Pre Requisites:
  • Though, all your data might just be safe. It’s always recommended for you to back up the data so that just in case if the data gets lost or corrupted, the same can be restored manually with the help of below mentioned steps.
SMS – Use “SMS Backup & Restore app”,
Contacts – Sync with the Gmail application,
Call Log - Call Log and Restore
Images, Songs, Videos, Files – Copy to internal / External SD Card,
APN and MMS Settings – Note down from the path “Applications > Settings > Wireless and Network > Mobile Networks > Access Point Names”
  • Head over to the path “Settings > Applications > Development > USB debugging” in your Samsung Galaxy Note 3 so as to enable the USB Debugging Mode. Make sure that your device is left with the minimum of 50% of battery life or else the device may get turned off in the middle of firmware update.
Disclaimer: We should not be held responsible in any manner for any damage happened to your Galaxy Note 3 due to not following the instructions mentioned in the article.

Let’s head over to the next step where we have mentioned the detailed guide which will help you upgrade the device firmware with the latest firmware.

Procedure to Manual Update Galaxy Note 3 N900 with XXUDNC4 Kitkat 4.4.2 Firmware:
  • Press and hold Home + Power + Volume down buttons to enter the device in the Download Mode. If your Galaxy Note 3 enters in the Normal mode, then you need to re try the process of entering the device in the Download Mode.
  • Click on “AP” tab in the Odin to select the tar file which you got after extracting the firmware package to click on “Start” in Odin.
  • Once you click on “Start”, you will now need to wait for the whole process of firmware gets finished. The whole process of firmware update will take around 3 -4 minutes and once done, the phone will be rebooted automatically.
Note: If at all your Galaxy Note 3 smartphone gets in the boot loop mode, then you need to turn off the device and then reapply the update from the start. To turn off you can reinsert the battery or say you can long press the power button.

Do let us know in the comments section just in case if you face any issues in the process of firmware update.

PayPal launches biometric authentication for the Samsung Galaxy S5 in 25 countries

PayPal launches biometric authentication for the Samsung Galaxy S5 in 25 countries


PayPal has announced the availability of the PayPal app with fingerprint authentication on the new flagship device from Samsung, the Samsung Galaxy S5. This app gives its users the ability to login with fingerprint to shop with PayPal on the Samsung Galaxy device across 25 countries. This app lets the users to login to the PayPal account from mobile just your fingerprint.

Samsung Galaxy S5 users who use the PayPal app will receive $50 USD or more in offers at several merchants that accept PayPal and it is available on the Samsung Gear Fit and Gear 2 device also. On the Galaxy Gear 2, users can pay at local stores, save money and redeem offers and also receive payment notifications and check the balance on the Gear 2 device using this PayPal app.


Samsung and PayPal merged up and it was announced in Barcelona Spain earlier this year in the MWC 2014 event. They announced that Samsung Galaxy S5 users will be the first to login and shop at any merchant that accepts PayPal on Mobiles and in-store just with the fingerprint making PayPal the first global payment company to support Samsung’s mobile fingerprint authentication technology.

Customers can use their finger to pay with PayPal from their new Samsung Galaxy S5 because the FIDO Ready software on the device securely communicates between the fingerprint sensor on their device and PayPal’s service in the cloud. The only information the device shares with PayPal is a unique encrypted key that allows PayPal to verify the identity of the customer without having to store any biometric information on PayPal’s servers – said John Lunn from PayPal Developer Network.

With this PayPal app we can now pay bill easily by accessing to the PayPal account and we will have the required security with the fingerprint scanner, giving us more luxury to use it. It is available globally across 25 countries that include United States, Australia, Austria, Belgium, Denmark, Finland, Brazil, France, Germany, Hong Kong, Ireland, Norway, Poland, Portugal, Russia, Singapore, Spain, Sweden, Switzerland, Turkey, Italy, Luxembourg, Mexico, Netherlands and United Kingdom.

Monday 14 April 2014

Samsung Galaxy S5 Tip: How to unlock Developer Options in Settings

Samsung Galaxy S5 Tip: How to unlock Developer Options in Settings


There are many reasons why one would want to get into the developer section and play around with the various options in it. One of them would be to enabled the debugging whenever you are trying to enter any commands in the command prompt, or want to debug to play with the codes as a programmer. 

The Samsung Galaxy S5 being one of the best smartphones around, you would be one of those looking to get into the developer options and do a lot more and explore what could be done on this high-end device.
The developer options are kept hidden by default in the smartphones which have Android 4.2 and later versions, and you need to do some tapping on the screen to enable these options on your Galaxy S5, which runs the Android 4.4.2 KitKat OS. Here are the steps which you need to follow to enable the developer options in the Samsung Galaxy S5.


http://android-developers-officials.blogspot.com/2014/04/samsung-galaxy-s5-tip-how-to-unlock.html


Go to Settings
Scroll to “System” section, and under that, tap on “About Device”
Scroll to “Build Number”
Tap the Build Number section for seven times continuously, and during this you would even be warned that you are going to unlock the Developer options in the phone

Once you tap the section for seven times, the options would get unlocked and you would then be able to see the new section of Developer options in the settings. This can be done only once because once you have unlocked it, it won’t get hidden anytime again and it would always stay there. Thus, you should enable these only if you are sure there is something you need there.


If you don’t want to use the developer options in the Galaxy S5, you can just turn them off by disabling everything on the right top side in the same settings page. This won’t totally remove the section, but at least you won’t directly tap and enable or disable one of the options without enabling the entire section.

Asus Fonepad 7 Dual SIM Android Tablet Launching in India on April 15th – Pricing & Spec

Asus Fonepad 7 Dual SIM Android Tablet Launching in India on April 15th – Pricing & Spec


Asus is going to the launch the Fonepad 7 Dual SIM in India on April 15th. We have seen that the company has launched the Fonepad 7 with 3G and voice calling in India last year. This device was announced in the MWC 2014 that was held in Barcelona, Spain earlier this year. This is a 7 inch device with Intel Atom Z2520 processor running on Android 4.3 Jelly Bean Operating system.


The Fonepad 7 Dual SIM flaunts a 7 inch HD LED Backlit IPS touch screen display and will be running on Android 4.3 Jelly Bean Operating System. The device is powered by a 1.2 GHz dual core Atom Z2520 processor with 300 MHz PowerVR SGX544 GPU coupled with 1 GB of RAM and has a 3950 mAh battery on the back to power it and the according to the company it comes with up to 28 hours of talk time and up to 35 days of standby.


There is a 5 Mp camera on the rear of the device with 1080p Full HD video recording and has a 1.2 MP front facing camera with 720p video recording. The connectivity of the device includes 3G HSPA+, Wi-Fi 802.11 b/g/n, Bluetooth v3.0 and GPS. The on board memory on the device is at 8 GB that can be futer extended up to 64 GB with micro SD card slot.

Specifications of Fonepad 7 Dual SIM


7-inch HD LED Backlit IPS display with 10 finger multi-touch
1280 x 800 pixel resolutions
1.2 GHz dual-core Intel Atom Z2520 processor with 300 MHz PowerVR SGX544 GPU
Dual SIM with dual standby
Android 4.3 Jelly Bean OS
5 MP rear camera with 1080p Full HD video recording
1.2 MP front camera with  720p Video Recording
1 GB RAM
8 GB internal memory, expandable memory up to 64 GB with micro SD card
Connectivity: 3G HSPA+, WiFi 802.11 b/g/n, Bluetooth 3.0, GPS
3950 mAh battery
11.35 mm thick and weighs 340 grams

The device will be coming in Gray and White color variants and the pricing and availability of the device is not yet mentioned.

Spice Stellar Glide Mi-438 Android Phone with 4-inch OGS display Launched for Rs. 5199

Spice Stellar Glide Mi-438 Android Phone with 4-inch OGS display Launched for Rs. 5199


The Stellar Glide Mi-438 is the new Smartphone from Spice in the Stellar series. Spice has been introducing many Smart phones to trying to improve its reputation and compete with many other big Smart phone makers in the market today. Stellar Glide Mi-438 is a 4 inch device powered by a 1.3 GHz dual core processor and will be running on Android 4.2 Jelly Bean Operating System. It also comes with Dual SIM support like most of the Smart phones in the Stellar series.

The Stellar Glide Mi-438 comes with a 4 inch 800 x 480 pixels touch screen display that is based on OGS (One Glass Solutions) technology and will be running on Android 4.2 operating System. The device is powered by an unknown dual core processor clocking at 1.3 GHz and coupled with a 512 MB of RAM. There is a 1350 mAh battery to power the device and the company claims that it will give a standby of 170 hours and 4.5 hours of talk time.


Coming to the camera the device has 2 MP rear facing camera with LED flash and a 1.3 MP camera on the front. The connectivity of the device includes 3G, Wi-Fi 802.11 b/g/n, Bluetooth v3.0 with A2DP and GPS. The Stellar Glide Mi-438 has a on board memory of 4 GB that can be further extended up to 32 GB via micro SD card slot.

Specifications of Stellar Glide Mi-438


4 inch touch screen OGS display
800 x 480 pixels resolutions
Android 4.2 Jelly Bean OS
1.3 GHz dual core processor
Dual SIM
2 MP rear camera with LED flash
1.3 MP front facing camera
512 MB RAM
4 GB internal memory, expandable up to 32 GB via micro SD card
Connectivity: 3G, WiFi 802.11 b/g/n, Bluetooth 3.0 with A2DP, GPS
3.5 mm audio jack, FM Radio
1350 mAh battery

The device is a Dual SIM variant and will also coming with 2 GB of free storage on Spice Cloud backup, on the launch T M Ramakrishnan, the CEO of Spice Retail Ltd claimed that, Stellar Glide Mi-438 is a power driven device with its 1.3 GHz dual core processor and the expandable memory of 32 GB. He also said that they believe in catering to Consumers needs and aspirations and said that the Stellar Glide with GMS certifications is another device for exceeding the expatiations of the consumers.
The Stellar Glide Mi-438 is priced at Rs. 5199 (MOP) and will be coming in White color variant, available across India in all major retailers. The company is also offering a free flip cover with the device that is worth Rs. 500 and also screen guard with the Smart phone.

Check if your Android Phone is Heartbleed Affected [Security Vulnerability Detector]

Check if your Android Phone is Heartbleed Affected [Security Vulnerability Detector]


Calling yourself an active Internet user? you might not be one if you haven’t heard about the latest bug in the Internet security, called Heartbleed. We talked a lot about Heartbleed here, but if you aren’t sure what this is all about, do check that article to understand it better, and keep yourself safe from compromising your account data.

In short, Heartbleed is a bug in the OpenSSL security which was giving access to the hackers because there was an issue with the secret keys which get compromised and available to the hackers, and these secret keys are what would encrypt the traffic, including the names and passwords and all the personal content of the users.

The research team which found this major bug, did make a tool available for the users to check and understand whether a particular website is affected by the bug or not. But this issue isn’t limited to just the Internet, but is also seen on the devices which are using particular versions of the OpenSSL security for the authentication and security of the devices. There were some suggestions from the security firms that staying offline and not playing around with your online accounts would be a safe option for now, but you can’t stay away from your Android device for long, right? Here’s an app which would at least tell you if your phone has the security version which is affected by the Heartbleed bug.


Heartbleed Detector is an app available for the Android devices, to check if the version of OpenSSL in your device is affected by the Heartbleed bug. There is a certain behavior which if enabled, could lead to a problem to the security of the device and that too is checked by the app.

The app doesn’t do anything else than that, and it doesn’t check the individual apps for finding about the vulnerability, but you at least would get an idea whether the phone has a security version running which is at risk. And for now, there is no fix to this and if your device is running that version of OpenSSL, you need to ensure that the risky function is not turned on.

Download Heartbleed Detector for Android from Google Play Store – Link.

Download Stock/ Default Wallpapers of Samsung Galaxy Note PRO 12.2

Download Stock/ Default Wallpapers of Samsung Galaxy Note PRO 12.2


Samsung Galaxy Note PRO 12.2 Android tablet which comes with the 12.2 inches of screen size and 3GB of RAM is truly a powerful device and for all those who wanted to make use of the wallpapers which comes by default in this device can easily make use of the same. So let’s check out on what are the wallpapers which are there in this device by default. 

The best part of the wallpapers which we will be checking out are the static wallpapers which means that it not only is compatible with almost all the Android tablets but also eats less battery when compared to the battery taken by the Live Wallpapers.
With AMOLED screen laden tablet, the wallpapers which come by default in this Galaxy Note Pro comes in vivid colors.

Guide to Set Samsung Galaxy Note PRO 12.2 Android Wallpapers in any Android Tablet:


http://android-developers-officials.blogspot.com/2014/04/download-stock-default-wallpapers-of.html

http://android-developers-officials.blogspot.com/2014/04/download-stock-default-wallpapers-of.html


  • Place the extracted wallpapers in the “Wallpapers” folder in your tablet. You can also merge the contents of the folder if your phone already has a folder called as “Wallpapers”.
  • Once you have placed the folder in your Android device all you need to do is to just disconnect the device from the computer to navigate to the folder “Wallpapers” to select the Wallpapers which you wish to set the wallpaper as.
  • You can open the wallpaper, tap on the Menu button to set the same as Wallpaper. You can make use of ES File Explorer to do the same.
Do let us know in the comments section just in case if you face any issues in the process of setting these wallpapers in your tablet.

How to Update Galaxy S4 Mini I9195 Android Phone with XXUBNB3 Jellybean 4.2.2 Android OS – Guide

How to Update Galaxy S4 Mini I9195 Android Phone with XXUBNB3 Jellybean 4.2.2 Android OS – Guide


Galaxy S4 Mini I9195 Android smartphone users can now delight as you can now manually update your device with the latest yet stable release of Jellybean 4.2.2 Android OS. This update mainly focuses on the better RAM usage along with the bug fixes in terms of battery consumption. This update is dubbed as XXUBNB3 which ropes in the Jellybean 4.2.2 Android OS. So before we slip on to the detailed guide which will help you update your Galaxy S4 mini, lets proceed on to know the list of quick pre requisites mentioned below.


http://android-developers-officials.blogspot.com/2014/04/how-to-update-galaxy-s4-mini-i9195.html


Note: XXUBNB3 is the official Jellybean 4.2.2 Android release from Samsung in select countries. Applying this update won’t root the device in any manner or void the warranty.

Quick Pre Requisites:
  • Create a backup of all the data present in your device manually with the help of below mentioned steps and not the KIES.
SMS – Use “SMS Backup & Restore app”,
Contacts – Sync with the Gmail application,
Call Log - Call Log and Restore
Images, Songs, Videos, Files – Copy to internal / External SD Card,
APN and MMS Settings – Note down from the path “Applications > Settings > Wireless and Network > Mobile Networks > Access Point Names”
  • Navigate to “Settings > Applications > Development > USB debugging” in your Galaxy S4 Mini I9195 so as to enable the USB Debugging Mode. Make sure that the device is left with the minimum of 50% battery life to avoid device getting turned off in the middle of update process.
Disclaimer: We should not be held responsible in any manner for any damage happened to your Galaxy S4 Mini I9195 due to not following the instructions mentioned in the article.

Let’s slip on to the next step where we have mentioned the detailed guide which will help you update the device with the latest jellybean 4.2.2 firmware.

Procedure to Update Galaxy S4 Mini with Jellybean 4.2.2 XXUBNB3 Firmware:
  • Download the Jellybean 4.2.2 Firmware package for Galaxy S4 mini from here to your computer along with the Odin. Once downloaded, extract both the packages and open Odin in your computer.
  • Turn off your Galaxy S4 mini so that it can then be entered in the Download Mode. To get your device in the download mode, hold the Volume Down button + the Home key button (the middle button) and while holding these both buttons, switch ON your device to see the Green Robot on the screen which is nothing but the download mode.
  • If your phone boots up in the normal mode, you need to again turn off the device and re try the process of entering the device in the download mode.
  • Assuming Odin is opened in your computer, connect your phone in Download mode to computer with the help of original USB cable. Once you connect, you will note that ID:COM section will turn yellow/ green indicating that all the drivers are installed successfully. If the drivers are not installed, you need to re install the same from official Samsung’s website.
  • Once done, click on “AP” to choose the Firmware file which you got after extracting and click on “Start” to start the process of updating. It will take around a minute for updating the device. In some cases it may take even longer time than expected.
Note: Just in case if Galaxy S4 Mini gets in the boot loop sequence then you need to turn off the device and then reapply the update from the start. To turn off you can reinsert the battery or say you can long press the power button.

So there you go, you have now successfully installed the latest update of Jellybean 4.2.2 in your tablet which can be checked from the path “Settings > More > About Phone”. In coming days, we will also be checking out on what are the custom ROM firmwares based on Jellybean 4.2.2 and Kitkat 4.4.2. Do let us know in the comments section just in case if you come across any issue.

How to Update Galaxy Star Pro GT-S7262 with XXUANC1 Jellybean 4.1.2 Firmware – Guide

How to Update Galaxy Star Pro GT-S7262 with XXUANC1 Jellybean 4.1.2 Firmware – Guide


Samsung Galaxy Star Pro with dual SIM card slot (GT-S7262) can now be updated with the latest version of Jellybean 4.1.2 Android OS which comes officially from Samsung. Dubbed as XXUANC1, this update is available for regions India, Bangladesh, Nepal & Sri Lanka. This firmware comes with the stability fixes, Jellybean features along with many other minor UI changes. 

Unfortunately, citing hardware limitations Samsung might not launch / delay the launch of Kitkat 4.4 android OS for this device. So let’s check out on what are the quick pre requisites mentioned below before we slip into the detailed instructions which will help you update the device.


http://android-developers-officials.blogspot.com/2014/04/how-to-update-galaxy-star-pro-gt-s7262.html


Note: XXUANC1 is the official firmware update released by Samsung for Galaxy Star Pro. Applying this official release manually won’t void the warranty or root the device in any manner.
Quick Pre Requisites:
  • All the data in your Galaxy Star Pro (GT-S7262) needs to be backed up with the help of below mentioned steps. You need to back up all the data manually with the help of below mentioned steps.
SMS – Use “SMS Backup & Restore app”,
Contacts – Sync with the Gmail application,
Call Log - Call Log and Restore
Images, Songs, Videos, Files – Copy to internal / External SD Card,
APN and MMS Settings – Note down from the path “Applications > Settings > Wireless and Network > Mobile Networks > Access Point Names
  • Head over to the path “Settings > Applications > Development > USB debugging” in your Galaxy Star Pro (GT-S7262) so as to enable the USB Debugging Mode. Make sure that the device is left with the minimum of 50% battery life to avoid device getting turned off in the middle of update process.
Disclaimer: We should not be held responsible in any manner for any damage happened to your Galaxy Star Pro (GT-S7262) due to not following the instructions mentioned in the article.
Let’s slip on to the next step where we have mentioned the detailed guide which will help you update the device with the latest jellybean 4.1.2 firmware.

Procedure to Update Galaxy Star Pro (GT-S7262) with Jellybean 4.1.2 Firmware:
  • Download the appropriate firmware package from below to your computer along with the Odin. Once downloaded, extract both the packages and open Odin in your computer.
  • Turn off your Galaxy Star Pro so that it can then be entered in the Download Mode. To get your device in the download mode, hold the Volume Down button + the Home key button (the middle button) and while holding these both buttons, switch ON your device to see the Green Robot on the screen which is nothing but the download mode.
  • If your phone boots up in the normal mode, you need to again turn off the device and re try the process.
  • Assuming Odin is opened in your computer, connect your phone in Download mode to computer with the help of original USB cable. Once you connect, you will note that ID:COM section will turn yellow/ green indicating that all the drivers are installed successfully. If the drivers are not installed, you need to re install the same from official Samsung’s website.
  • Once done, click on “AP” to choose the Firmware file which you got after extracting and click on “Start” to start the process of updating. It will take around a minute for updating the device. In some cases it may take even longer time than expected.
Note: Just in case if Galaxy Star Pro gets in the boot loop sequence then you need to turn off the device and then reapply the update from the start. To turn off you can reinsert the battery or say you can long press the power button.

So there you go, you have now successfully installed the latest update of Jellybean 4.1.2 in your tablet which can be checked from the path “Settings > More > About Phone”. In coming days, we will also be checking out on what are the custom ROM firmwares based on Jellybean 4.1.2 and Kitkat 4.4.2. Do let us know in the comments section just in case if you come across any issue.

Gionee Pioneer P4 Android Phone with 4.5-inch Display Launched – Specs, Pricing

Gionee Pioneer P4 Android Phone with 4.5-inch Display Launched – Specs, Pricing


Gionee has launched the next device in the Pioneer series, the Gionee Pioneer P4 Android phone which comes with a 4.5-inch display and a quad-core processor, and the device although isn’t officially launched on the website, it is already available on the eBay store for a price of Rs. 9800.

Similar to its predecessor P3, the Gionee Pioneer P4 comes with the Dual-SIM connectivity and there are a few upgrades from the previous one, as you get 1GB RAM, 8GB of internal storage and 1800 mAh battery. The 4.5-inch screen covers the WXVGA display with the screen resolution of 480 x 854 pixels and the internal powering in the smartphone is by a 1.3 GHz quad-core processor. The Pioneer P4 runs the Android 4.2.2 Jelly Bean OS.


http://android-developers-officials.blogspot.com/2014/04/gionee-pioneer-p4-android-phone-with-45.html


Camera wise, the device has a 5-megapixel rear camera with the LED flash and a 2-megapixel front facing camera. The rear camera can record 720p HD videos. Although there is 8GB of internal storage included in the phone, there is an option to expand the storage to 32GB with the MicroSD card support. The connectivity options available in the Gionee Pioneer P4 include 3G, Wi-Fi 802.11 b/g/n, Bluetooth, GPS and there is FM radio included.
Available for the price of Rs. 9800 although there is no official pricing known, the smartphone is available in the black and white colors.


http://android-developers-officials.blogspot.com/2014/04/gionee-pioneer-p4-android-phone-with-45.html

Gionee Pioneer P4 Specifications

Screen: 4.5-inch WXVGA display, 480 x 854 pixels screen resolution
Processor: MediaTek MT6582 processor, 1.3 GHz quad-core
RAM: 1GB
OS: Android 4.2.2 Jelly Bean
Rear camera: 5-megapixel, LED flash, HD video recording
Front camera: 2-megapixel
Storage: 8GB internal, expandable with 32GB with MicroSD card
Connectivity: Wi-Fi 802.11 b/g/n, Bluetooth, GPS
Battery: 1800 mAh

The Pioneer P3 from Gionee had 512MB RAM, 4GB of internal storage and 1700 mAh battery, and these are the major areas where Gionee has come up with the upgrade in the Pioneer P4. Gionee has been doing a lot in the high-end and mid-range segments than in the budget segment, as the company recently had launched the Gionee Elife E7 and then had come up with the world’s slimmest smartphone, the Gionee Elife S5.5 which has a thickness of just 5.5mm, and is priced at around Rs. 22000. The budget segment includes the Pioneer and GPad series from Gionee.

Sunday 13 April 2014

How to Update Galaxy Note Pro 12.2 with Kitkat 4.4.2 XXUANC4 Firmware – Guide

How to Update Galaxy Note Pro 12.2 with Kitkat 4.4.2 XXUANC4 Firmware – Guide


Galaxy Note Pro 12.2 (SM-P901) can now be updated with the latest version of XXUANC4 firmware which ropes in the latest Kitkat 4.4.2 firmware. This firmware was earlier launched as an OTA update and can be applied to all international versions as well. Just in case if you have rooted the device and installed the beta custom ROM firmware versions can make use of this firmware to restore back the lost warranty due to rooting the Galaxy Note Pro 12.2. So after checking out the quick list of pre requisites mentioned below, let’s head over to the detailed guide which will help you update the device manually.


http://android-developers-officials.blogspot.com/2014/04/how-to-update-galaxy-note-pro-122-with.html


Note: Please note that applying this update manually won’t root the device in any manner as this is the official update released by Samsung and not the custom ROM firmware.

Quick Pre Requisites:
  • All the data in your Galaxy Note Pro 12.2 (3G) SM-P901 needs to be backed up with the help of below mentioned steps. You need to back up all the data manually with the help of below mentioned steps.
SMS – Use “SMS Backup & Restore app”,
Contacts – Sync with the Gmail application,
Call Log - Call Log and Restore
Images, Songs, Videos, Files – Copy to internal / External SD Card,
APN and MMS Settings – Note down from the path “Applications > Settings > Wireless and Network > Mobile Networks > Access Point Names”
  • Head over to the path “Settings > Applications > Development > USB debugging” in your Galaxy Note Pro 12.2 (3G) SM-P901 so as to enable the USB Debugging Mode. Make sure that the device is left with the minimum of 50% battery life to avoid device getting turned off in the middle of update process.
Disclaimer: We should not be held responsible in any manner for any damage happened to your Galaxy Note Pro 12.2 due to not following the instructions mentioned in the article.
Assuming that you are done with all the above mentioned steps, let’s head over to the next step where we have mentioned the detailed steps which will help you update the device.

Procedure to Update Galaxy Note Pro 12.2 with Kitkat 4.4.2 Firmware:
  • Turn off your Galaxy Note Pro and after 5 seconds or when your device gives a small vibration which indicated that the device is turned Off completely. Now, hold the Volume Down button + the Home key button (the middle button) and while holding these both buttons, switch ON your device to see the Green Robot on the screen.
  • Connect your device in Download mode to computer with the help of original USB cable. In Odin, the ID:COM section will turn yellow/ green indicating that all the drivers are installed successfully. If the drivers are not installed, you need to re install the same from official Samsung’s website.
  • Once done, click on “AP” to choose the Firmware file which you got after extracting and click on “Start” to start the process of updating. It will take around a minute for updating the device. In some cases it may take even longer time than expected.
Note: Just in case if your Galaxy Note Pro 12.2 (3G) SM-P901 gets in the boot loop sequence then you need to turn off the device and then reapply the update from the start. To turn off you can reinsert the battery or say you can long press the power button.

So there you go, you have now successfully installed the latest update of Kitkat 4.4.2 in your tablet which can be checked from the path “Settings > More > About Tablet”. In coming days, we will also be checking out on what are the custom ROM firmwares based on Kitkat 4.4.2. Do let us know in the comments section just in case if you come across any issue.

How to Root Galaxy Note Pro 12.2 (3G) SM-P901 on Kitkat 4.4.2 Firmware – Guide

How to Root Galaxy Note Pro 12.2 (3G) SM-P901 on Kitkat 4.4.2 Firmware – Guide


Samsung recently launched the bigger tablet with 12.2 inches of screen size which is dubbed as SM-P901 which comes with the Kitkat 4.4.2 Android device. While this device gives in the much needed premium feel with the best in class finishing and overall body, you can now root this tablet. Once you root this android tablet, you will then be able to install many apps which need root access and install the custom ROM firmwares to further enhance your user experience with the. After checking out on what are the quick list of pre requisites mentioned below, we will head over to the detailed guide which will help you root the device.


http://android-developers-officials.blogspot.com/2014/04/how-to-root-galaxy-note-pro-122-3g-sm_13.html

Note: This procedure only works on the Kitkat 4.4.2 Android Firmware and not on any other firmware version.


Quick Pre Requisites:
  • All the data in your Galaxy Note Pro 12.2 (3G) SM-P901 needs to be backed up with the help of below mentioned steps. You need to back up all the data manually with the help of below mentioned steps.
SMS – Use “SMS Backup & Restore app”,
Contacts – Sync with the Gmail application,
Call Log - Call Log and Restore
Images, Songs, Videos, Files – Copy to internal / External SD Card,
APN and MMS Settings – Note down from the path “Applications > Settings > Wireless and Network > Mobile Networks > Access Point Names”
  • Head over to the path “Settings > Applications > Development > USB debugging” in your Galaxy Note Pro 12.2 (3G) SM-P901 so as to enable the USB Debugging Mode. Make sure that the device is left with the minimum of 50% battery life to avoid device getting turned off in the middle of process.
Disclaimer: We should not be held responsible in any manner for any damage happened to your Galaxy Note Pro 12.2 (3G) SM-P901 due to not following the instructions mentioned in the article.
Once you have backed up all the data in your device, you now will have to proceed to the next step where we have mentioned the detailed guide which will help you root the device.

Procedure to Root Galaxy Note Pro 12.2 (3G) SM-P901:
  • Download CF Root for your Galaxy Note Pro and Odin from here to your computer. Once downloaded, you now need to enter your Galaxy Note Pro 12.2 (3G) SM-P901 in download mode.
  • Turn off your Galaxy Note Pro 12.2 (3G) SM-P901 and after 5 seconds or when your device gives a small vibration, hold the Volume Down button + the Home key button (the middle button). While holding these both buttons, you need to switch ON your device to see the Green Robot on the screen.
  • Connect your device in Download mode with the computer in which you have opened the Odin. In Odin you will see that the ID:COM section will turn yellow indicating that all the drivers are installed successfully. If the drivers are not installed, you need to re install the same from official Samsung’s website.
  • Once done, click on “AP” to choose the CF Root Package and click on “Start” to start the process of rooting. It will take around a minute for rooting the device. In some cases it may taken even longer time than expected. Once rooted, the device will be rebooted on its own and then it will install all the apps again.
  • Download the “Root Checker” app from the Google PLAY Store to check on whether the device is rooted or not. Just in case if the device is not rooted, you need to retry the process of rooting by following the above instructions from the start.
Tip: Since rooting voids warranty, if you need to get back the lost warranty, you need to update the device with the stock firmware again.

Note: Just in case if your Galaxy Note Pro 12.2 (3G) SM-P901 gets in the boot loop sequence then you need to turn off the device and then reapply the update from the start. To turn off you can reinsert the battery or say you can long press the power button.

So there you go, you have now successfully rooted your Galaxy Note Pro 12.2 (3G) SM-P901. Do let us know in the comments section just in case if you come across any issue.

Is Samsung Galaxy S5 worth an upgrade from Galaxy S4?

Is Samsung Galaxy S5 worth an upgrade from Galaxy S4?


If you already own a Galaxy S4 and are thinking to upgrade to the S5, or you are planning to get a new Galaxy device and are confused between the Galaxy S4 and S5, this one is for you to read and make a decision. As we have seen with the Galaxy S3 which is still in market and in demand as well, the S4 will also be available and with the pricing making a big difference between the two devices, many customers will be confused between these two devices because one has some exceptional new features, while other one compromising those will have a good pricing.


http://android-developers-officials.blogspot.com/2014/04/is-samsung-galaxy-s5-worth-upgrade-from.html


Let me show you the difference between the two devices in all the aspects – technical, design and other specifications which might help you decide between the Galaxy S4 and S5.

Should I Upgrade from Galaxy S4 to Galaxy S5?
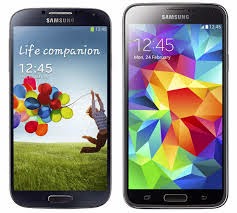
The shape of the device is almost similar, with Samsung sticking to its design right from the Galaxy S3 to S5, and this new device is slightly bigger compared to the Galaxy S4. Dimensions wise, the S5 measures 142 x 72.5 mm and the S4 measures 136.6 x 69.8 mm. The thickness of S5 is also increased, being at 8.1mm compared to S4 at 7.9 mm. With the increase is size the weight of the device also increases with S5 at 145g and S4 at 130g.

Samsung has also stuck to the plastic back casing which was seen in S4 as well, it was rumoured that metal and faux leather like in Note 3 would be seen but a dotted plastic case is what Samsung has stuck to. There is an additional sensor at the back below the camera, which is used to record your Heart rate and the Home Button is slightly larger as it accommodates the Finger print scanner.
The charger and USB port along with the earphones socket come with covers to help in the IP67 proofing of S5 which is Water and Dust resistant. There was no such waterproofing or water resistant feature in the Galaxy S4.


Display
The Display part of these 2 phones are not that different as the Screen size is just a little bit bigger which I must say is nothing new or worth appreciating being 0.1 inch bigger. The Galaxy S5 comes with a 5.1 inch Super AMOLED display where the Galaxy S4 comes with a 5-inch display and both the devices come with the same resolution, i.e. 1080p Full HD. There is no much difference while viewing Full HD 1080p movies in both the devices.

Display plays a major part in battery life of any smartphone and the Galaxy S5 comes with 2 features which help increase the battery life to a great extent which are not available for the Galaxy S4 at the moment:
Dim Mode: This is available in S4 as well named Power saving mode, this feature turns down the brightness of the display considerably depending on the Light available which is useful at night to be easy on your eyes and save battery life as well.

Ultra Power Saver Mode: This feature is new and not available in Galaxy S4, when activated the Screen turns to Black and White and also only a select number of Apps are available which makes battery last longer.

In the Display department there is no much improvement of drastic change so if you are more concentrated on the Display factor then you can go for the S4 and save some serious money compared to the S5.


Processor
Samsung has upgraded this aspect of S5 with a Qualcomm’s 2.5GHz quad-core Snapdragon 801 processor compared to the Qualcomm 1.9GHz quad-core Snapdragon 800 processor which we can see significant increase in certain functions like camera, use of various high end gaming apps etc. So if you are looking at the processor aspect for your new phone then Galaxy S5 surely wins over the S4 in this department.

Sensors
Samsung Galaxy S5 has got a lot of upgrades compared to the S4, there are 2 Sensors included in the S5 – Fingerprint sensor and Heart rate monitor.
The Fingerprint sensor a new addition to the S5 is embedded under the Home button below the Display. The Fingerprint sensor or reader is a swipe styled sensor which can be used to unlock your device by placing your finger on the bottom of display and sliding it down by following the indication given by Samsung on the bottom of screen. You can also use this sensor to pay through Paypal for which you have to register your device and fingerprint to authorize for future use.
The Heart rate Sensor is another sensor which will measure your heart rate in beats per minute (bpm) with the help of the S Health app. You can get the Gear Fit fitness band for your Galaxy S4 to check your Heart rate.
These 2 features are not available on S4 and it is upto you to decide if you need the fingerprint scanner and the heart rate monitor and decide which device to buy.

Camera
This is another area where some improvement is seen in the S5 compared to the S4, the number of megapixels has come to 16-megapixels in the S5 compared to the 13-megapixels of the S4. There are some other features like the Hybrid Autofocus system which is seen in high end cameras, this means that S5 takes just 0.3 seconds to focus and this surely makes the camera already way ahead of the S4.
There is another feature called the “Selective Focus” or “Selective Blur” which will let you Focus on certain parts of the image after the picture is taken.

Video recording is the one which takes the S5 way ahead of the S4 with the ability of S5 to record videos at 4K (3840 x 2160) making the video record details at a very deep level. This feature is not available in S4.
If you are one who uses a lot of camera and record videos then S5 it is for you compared to the S4 which has a decent camera but is no match for the S5.

Software and Features
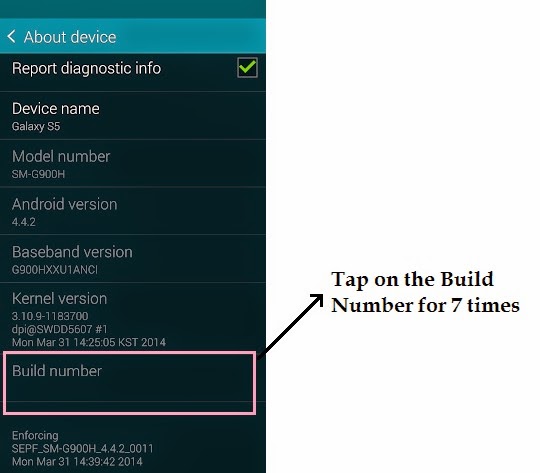
Samsung Galaxy S5 comes with a revamped version of the Android 4.4.2 Kitkat, along with a new version of the Touchwiz which completely changes the OS from what Kitkat looked like. The S Health App which was introduced in S4 now has an addition to it as it is combined with the Pulse Reader or the Heart Rate monitor present on the back of the device.
The Download Booster feature in the S5 brings an added advantage compared to the S4 as now your device takes help from both your Wifi and Network to make downloads much faster.


http://android-developers-officials.blogspot.com/2014/04/is-samsung-galaxy-s5-worth-upgrade-from.html


Battery
The Galaxy S5 comes with a 2,800mAh battery compared to the 2,600mAh battery of the Galaxy S4 which is a decent upgrade but the integration of the additional sensors and the slightly bigger screen can make the batteries give similar results. According to Samsung the new Touchwiz UI is supposed to help conserve battery better than the previous version so we can expect a bit of better battery life compared to S4.

Points to Consider and Conclusion
Galaxy S5 surely is an upgrade from the S4 but is it worth spending such a huge amount compared to the S4 is the thing to consider which can be done depending on what your requirements are.
Galaxy S5 has a better processor to increase the processing speed and help make your User Experience Lag free
Galaxy S5 has a better camera compared to the S4 with Selective Auto Focus and Hybrid Autofocus making it better
Galaxy S5 has a way better Video Recording capability with 4K video recording making it one of the best Video recording smart phones. In case you are very passionate about photography and video recordings, S5 seems to be a good alternative compared to the S4
The availability of the Heart Rate sensor and the Finger print scanner is an added advantage, but if you get the Gear fit fitness band even your S4 can record your heart rate
The Finger print scanner does not seem to be a thing which you will be missing if not present
The Download Booster is a good feature for users who download a lot of Big sized files this will surely help increase the speed of downloads as it uses both wifi and network Internet to do so
The Display does not have much of an upgrade so does the design and the back panel. Samsung should start thinking of changing the design a bit and stop playing safe with releasing device after device with the same design
Coming to the price, this is the main factor which is making everyone think twice and looking at the comparisons and differences between the Galaxy S4 and S5 to see if spending that much difference amount of money is worth it or not
In the end it is upto your requirements to decide if Galaxy S5 is your choice of device, but if you ask me at this point of time Galaxy s5 is on the costlier side at nearly $700 without contract compared to the $500 for the Galaxy S4.